

In my previous blog, we took a peek at Stackpath’s Workload features with Anycast. In this blog we will take a look at one of my other favorite compute providers: Packet and we will use Terraform to describe and deploy our infrastructure as code.
Packet
I have been using Packet for about 1,5 years now for various projects. There are a few things why I like Packet. It all started with their BGP and Anycast support, yup BGP straight to your server! That combined with their powerful bare-metal compute options, great customer success team and excellent Terraform support makes Packet one of my go-to supplier for my pet projects.
What are we building?
Alright, let’s dive in! A brief description of what we’re going to build today: We have a small Golang web application that does nothing more than print the machine’s hostname. We want this application to be highly available and deployed to various locations around the world so that our users can access it with low latency. In our case, we are going to deploy this to four Packet datacenters around the globe, with two instances in each datacenter. Each Packet server will have BGP enabled, and we’ll use Anycast for load balancing and high availability.
Using the Packet Terraform provider we can do all of this in an automated way, allowing me to all this in less than five minutes! Sounds like fun? Alright, let’s dive in.
Terraform
We could provision our servers using the web portal, but the ability to describe our infrastructure as code using Terraform is a lot easier and allows us to grow and shrink our deployment easily. If you’d like to play with this yourself and follow along: you can find the code for this demo on my Github page here.
Next up we will take a brief look at the important parts of the Terraform code.
First off we create a project in Packet, set some BGP parameters for this project (AS number and optionally a password). Next up comes the cool part, we reserve what Packet calls a global IPv4 address. This IP address is the Anycast address that we’ll be using and will be announced to Packet using the Bird BGP daemon from all our servers.
provider "packet" {
 auth_token = "${var.packet_api_key}"
}
# Create project
resource "packet_project" "anycast_test" {
 name = "anycast project"
 bgp_config {
 deployment_type = "local"
 #md5 = "${var.bgp_password}"
 asn = 65000
 }
}
# Create a Global IPv4 IP to be used for Anycast
# the Actual Ip is available as: packet_reserved_ip_block.anycast_ip.address
# We'll pass that along to each compute node, so they can assign it to all nodes and announce it in BGP
resource "packet_reserved_ip_block" "anycast_ip" {
 project_id = "${packet_project.anycast_test.id}"
 type = "global_ipv4"
 quantity = 1
}
Next up we define where we want to deploy our compute nodes to, and how many per datacenter.
module "compute_sjc" {
 source = "./modules/compute"
 project_id = "${packet_project.anycast_test.id}"
 anycast_ip = "${packet_reserved_ip_block.anycast_ip.address}"
 operating_system = "ubuntu_18_04"
 instance_type = "baremetal_0"
 facility = "sjc1"
 compute_count = "2"
}
module "compute_nrt" {
 source = "./modules/compute"
 project_id = "${packet_project.anycast_test.id}"
 anycast_ip = "${packet_reserved_ip_block.anycast_ip.address}"
 operating_system = "ubuntu_18_04"
 instance_type = "baremetal_0"
 facility = "nrt1"
 compute_count = "2"
}
module "compute_ams" {
 source = "./modules/compute"
 project_id = "${packet_project.anycast_test.id}"
 anycast_ip = "${packet_reserved_ip_block.anycast_ip.address}"
 operating_system = "ubuntu_18_04"
 instance_type = "baremetal_0"
 facility = "ams1"
 compute_count = "2"
}
module "compute_ewr" {
 source = "./modules/compute"
 project_id = "${packet_project.anycast_test.id}"
 anycast_ip = "${packet_reserved_ip_block.anycast_ip.address}"
 operating_system = "ubuntu_18_04"
 instance_type = "baremetal_0"
 facility = "ewr1"
 compute_count = "2"
}
I created a module to define the compute node, with that we can easily create many of them in the various datacenters. In the example above I created two instances in the following locations: San Jose (sjc1), Tokyo (nrt1), Amsterdam (ams1) and New York (ewr1).
Let’s take a quick look at the compute module:
variable facility { }
variable project_id { }
variable compute_count { }
variable operating_system { }
variable instance_type { }
variable anycast_ip { }
#variable bgp_password { }

resource "packet_device" "compute-server" {
 hostname = "${format("compute-%03d", count.index)}.${var.facility}"
 count = "${var.compute_count}"
 plan = "${var.instance_type}"
 facilities = ["${var.facility}"]
 operating_system = "${var.operating_system}"
 billing_cycle = "hourly"
 project_id = "${var.project_id}"

provisioner "local-exec" {
 command = "scp -o StrictHostKeyChecking=no -o UserKnownHostsFile=/dev/null scripts/create_bird_conf.sh root@${self.access_public_ipv4}:/root/create_bird_conf.sh"
 }

provisioner "local-exec" {
 command = "scp -o StrictHostKeyChecking=no -o UserKnownHostsFile=/dev/null scripts/web.go root@${self.access_public_ipv4}:/root/web.go"
 }

 provisioner "local-exec" {
 command = "scp -o StrictHostKeyChecking=no -o UserKnownHostsFile=/dev/null scripts/start.sh root@${self.access_public_ipv4}:/root/start.sh"
 }

 provisioner "local-exec" {
 command = "ssh -o StrictHostKeyChecking=no -o UserKnownHostsFile=/dev/null root@${self.access_public_ipv4} 'bash /root/start.sh ${var.anycast_ip} > /dev/null 2>&1 '"
 }
}

#Enable BGP for the newly creates compute node
resource "packet_bgp_session" "test" {
 count = "${var.compute_count}"
 device_id = "${packet_device.compute-server.*.id[count.index]}"
 address_family = "ipv4"
}
Alright that’s quite a bit of text, luckily most of it is pretty descriptive. The code above creates the compute node we requested at the specified datacenter. You will also see a few local-exec statements; these instruct Terraform to execute a script locally as soon as the instance is created. In this case, I used it to secure copy (scp) some files over and run start.sh on the compute node. Once you have more tasks, it will be easier and cleaner to replace this with an ansible playbook, but this will work just fine for now.
The start.sh script installs Bird (the BGP daemon), generates the correct Bird BGP config, restarts Bird and starts our Golang web service. Finally, we instruct Terraform to enable BGP on the Packet side for each of our compute nodes.
And we’re done! With this, we should be able to deploy our infrastructure using the commands below, and within 5 minutes we should have our application deployed globally with an Anycast IP.
So enough talking, let’s ask Terraform to build our infrastructure:
terraform plan
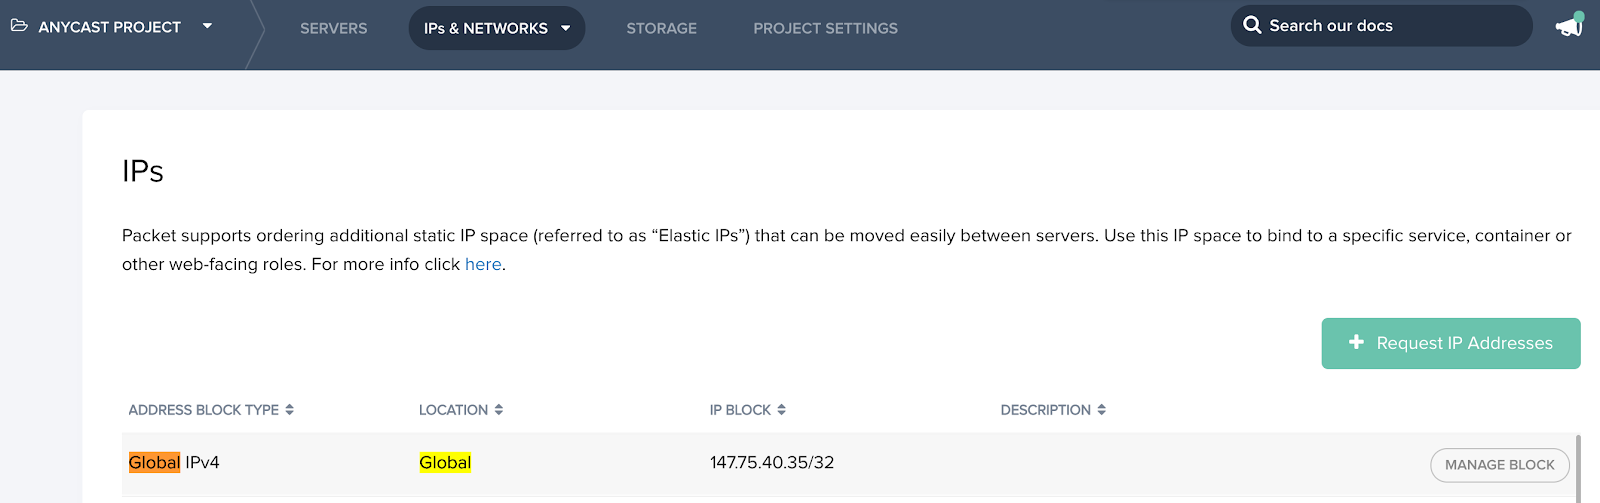
terraform applyWhile we wait, let’s keep an eye on the Packet portal to see what global IP we’ve been allocated. In my case, it’s 147.75.40.35/32.
Once Terraform is done you’ll see something like this.Apply complete! Resources: 18 added, 0 changed, 0 destroyed.
In this case, the 18 resources include: 1 Project, 1 Global IP, 8 compute nodes and 8 BGP sessions. In my case that took just 5 minutes! That’s amazing, eight new bare-metal machines, fully deployed, BGP running with an Anycast IP and my App deployed to various datacenters around the world, load balanced and all. A few years ago that was almost unthinkable.
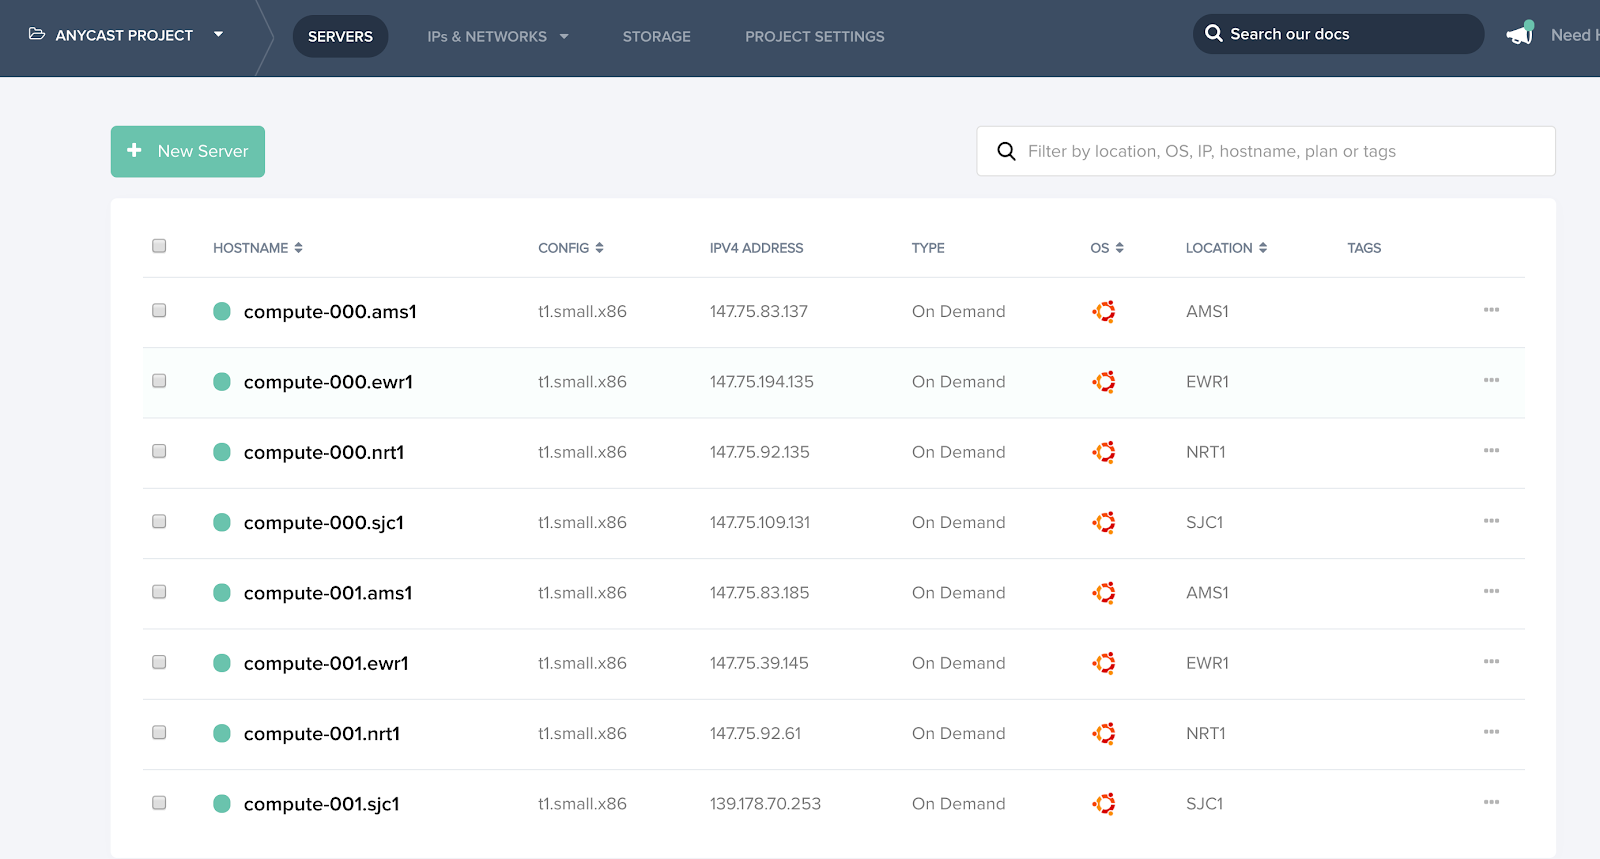
The Packet portal also shows the eight compute instances I requested with the hostnames and unicast IP addresses.
Time to test
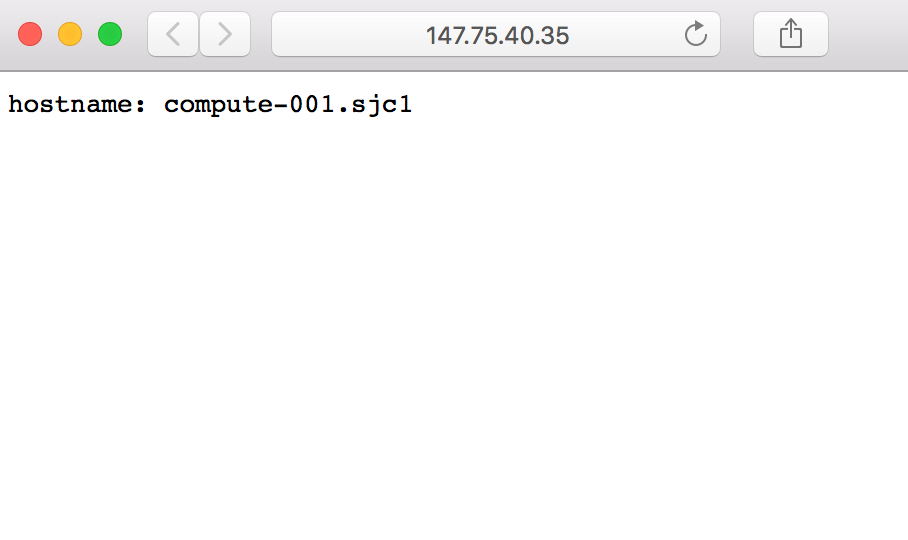
Alright so now this is all deployed we should be all done! Let’s test our Go web application using my local machine, it should be reachable via http://147.75.40.35 … boom! There it is.
Testing Anycast
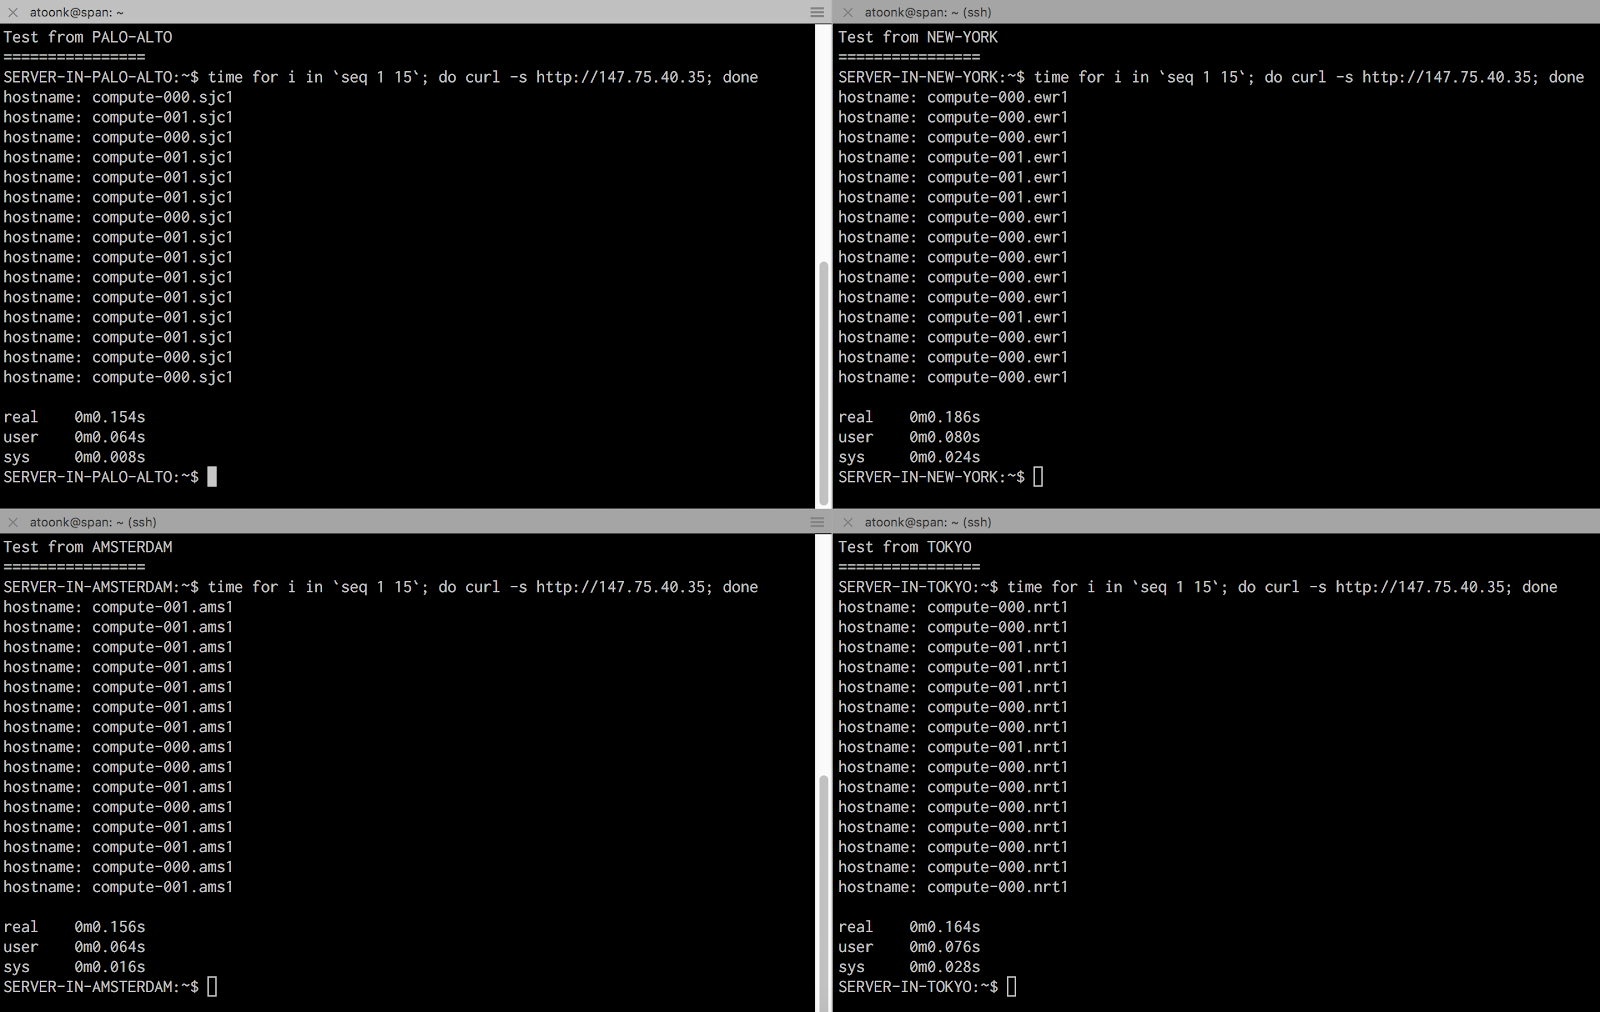
Cool, it works! I’m hitting the compute node in San Jose, which is as expected since that is closest to Vancouver, Canada. Next up let’s test from a few locations around the world to make sure Anycast routing works as expected. The screenshot below shows tests from a handful of servers outside the Packet network. Here I’m testing from Palo Alto, New York, Amsterdam, and New York. In all cases, we’re getting routed to the expected closest location, and in all cases, the requests are being load balanced between the two instances in a datacenter.
Now let’s say our web application all of a sudden becomes popular in Japan and in order to keep up with demand we need to scale up our resources there. Doubling our capacity in Tokyo is easy. All we do is edit the cluster.tf Terraform file and change the compute count number from 2 to 4.
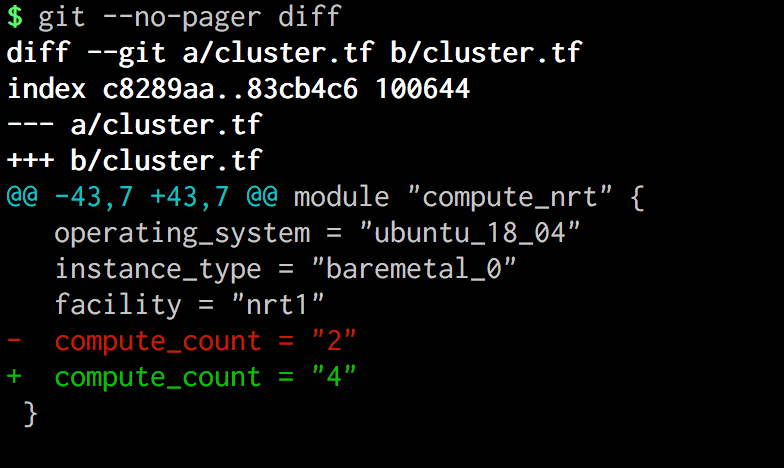
Run terraform plan and terraform apply, wait 5 minutes and voila. A few minutes later I indeed see that our clients hitting the Tokyo datacenter are indeed being load balanced over four instances now (compute-000.nrt1 compute-001.nrt1 compute-002.nrt1 compute-003.nrt1), instead of the two previously.
Summary
In this post we looked at deploying our little Golang App to 4 datacenters around the world with two instances per datacenter. We demonstrated how we can scale up deployments and how clients are being routed to the closest datacenter to guarantee low latency and saw requests being load balanced between the instances.
Even though we used actual bare-metal machines, the experience is mostly the same as deploying VM’s. I used the smallest instance type available to keep cost down. The Tiny But Mighty t1-small that I used is a 4 Core (atom C2550)CPU, 8GB RAM, with SSD storage and 2.5Gbps network connectivity for just $0.07 per hour, great for pet project likes these.
Packet provides many different configurations, should you need more powerful hardware, make sure to check out all options here.
The power of Terraform really shines for use-cases like this. Kudos to Packet for having excellent Terraform support, it’s pretty cool to do all of the above, including requesting a global Anycast IP using Terraform. The complete deployment takes about 5 minutes, no matter how many datacenters or instances.
Defining and deploying your applications like we did here, using infrastructure as code and Anycast used to be reserved for the large CDN’s, DNS and major infrastructure providers. Packet now makes it easy for everyone to build high available and low latency infrastructure. Working with Packet has been a great experience and I recommend everyone to give it a spin.