Often in my, now 20 years, networking career, I had to do some form of network performance testing. Use-cases varied, from troubleshooting a customer problem to testing new network hardware, and nowadays more and more Virtual network functions and software-based ‘bumps in the wire’.
I’ve always enjoyed playing with hardware-based traffic generators. My first experience with for example an IXIA hardware testing goes back to I think 2003, at the Amsterdam Internet Exchange where we were testing brand new Foundry 10G cards. These hardware-based testers were super powerful and a great tool to validate new gear, such as router line cards, firewalls, and IPsec gear. However, we don’t always have access to these hardware-based traffic generators, as they tend to be quite expensive or only available in a lab. In this blog, we will look at a software-based traffic generator that anyone can use - based on DPDK. As you’re going through this remember that the scripts and additional info can be found on my GitHub page here.

DPDK, The Data Plane Development Kit, is an Open source software project started by Intel and now managed by the Linux Foundation. It provides a set of data plane libraries and network interface controller polling-mode drivers that are running in userspace. Ok, let’s think about that for a sec, what does that mean? Userspace networking is something you likely increasingly hear and read about. The main driver behind userspace networking (aka Kernel bypass) has to do with the way Linux has built its networking stack; it is built as part of a generic, multi-purpose, multi-user OS. Networking in Linux is powerful and feature-rich, but it’s just one of the many features of Linux, and so; as a result, the networking stack needs to play fair and share its resources with the rest of the kernel and userland programs. The end result is that getting a few (1 to 3) million packets per second through the Linux networking stack is about what you can do on a standard system. That’s not enough to fill up a 10G link at 64 bytes packets, which is the equivalent of 14M packets per second (pps). This is the point where the traditional interrupt-driven (IRQs) way of networking in Linux starts to limit what is needed, and this is where DPDK comes in. With DPDK and userland networking programs, we take away the NIC from the kernel and give it to a userland DPDK program. The DPDK driver is a pull mode driver (PMD), which means that, typically, one core per nic always uses a 100% CPU, it’s in a busy loop always pulling for packets. This means that you will see that core running at 100%, regardless of how many packets are arriving or being sent on that nic. This is obviously a bit of waste, but nowadays, with plenty of cores and the need for high throughput systems, this is often a great trade-off, and best of all, it allows us to get to the 14M pps number on Linux.
Ok, high performance, we should all move to DPDK then, right?! Well, there’s just one problem… Since we’re now bypassing the kernel, we don’t get to benefit from the rich Linux features such as Netfilter and not even some of what we now think are basic features like a TCP/IP stack. This means you can’t just run your Nginx, Mysql, Bind, etc, socket-based applications with DPDK as all of these rely on the Linux Socket API and the Kernel to work. So although DPDK gives us a lot of speed and performance by bypassing the kernel, you also lose a lot of functionality.
Now there are quite a few DKDK based applications nowadays, varying from network forwarders such as software-based routers and switches as well as TCP/IP stacks such as F-stack.
In this blog, we’re going to look at DPDK-pktgen, a DPDK based traffic generator maintained by the DPDK team. I’m going to walk through installing DPDK, setting up SR-IOV, and running pktgen; all of the below was tested on a Packet.com server of type x1.small.x86 which has a single Intel X710 10G nic and a 4 core E3–1578L Xeon CPU. I’m using Ubuntu 18.04.4 LTS.
Installing DPDK and Pktgen
First, we need to install the DPKD libraries, tools, and drivers. There are various ways to install DPDK and pktgen; I elected to compile the code from source. There are a few things you need to do; to make it easier, you can download the same bash script I used to help you with the installation.
Solving the single NIC problem
One of the challenges with DPDK is that it will take full control of the nic. To use DPDK, you will need to release the nic from the kernel and give it to DPDK. Given we only have one nic, once we give it to DKDK, I’d lose all access (remember there’s no easy way to keep on using SSH, etc., since it relies on the Linux kernel). Typically folks solve this by having a management NIC (for Linux) and one or more NICs for DPDK. But I have only one NIC, so we need to be creative: we’re going to use SR-IOV to achieve the same. SR-IOV allows us to make one NIC appear as multiple PCI slots, so in a way, we’re virtualizing the NIC.
To use SR-IOV, we need to enable iommu in the kernel (done in the DPDK install script). After that, we can set the number of Virtual Functions (the number of new PCI NIC) like this.
echo 1 > /sys/class/net/eno1/device/sriov_numvfs
ip link set eno1 vf 0 spoofchk off
ip link set eno1 vf 0 trust on
dmesg -t will show something like this:
[Tue Mar 17 19:44:37 2020] i40e 0000:02:00.0: Allocating 1 VFs.
[Tue Mar 17 19:44:37 2020] iommu: Adding device 0000:03:02.0 to group 1
[Tue Mar 17 19:44:38 2020] iavf 0000:03:02.0: Multiqueue Enabled: Queue pair count = 4
[Tue Mar 17 19:44:38 2020] iavf 0000:03:02.0: MAC address: 1a:b5:ea:3e:28:92
[Tue Mar 17 19:44:38 2020] iavf 0000:03:02.0: GRO is enabled
[Tue Mar 17 19:44:39 2020] iavf 0000:03:02.0 em1_0: renamed from eth0
We can now see the new PCI device and nic name:
root@ewr1-x1:~# lshw -businfo -class network | grep 000:03:02.0
pci@0000:03:02.0 em1_0 network Illegal Vendor ID
Next up we will unbind this NIC from the kernel and give it to DPDK to manage:
/opt/dpdk-20.02/usertools/dpdk-devbind.py -b igb_uio 0000:03:02.0We can validate that like this (note em2 is not connected and not used):
/opt/dpdk-20.02/usertools/dpdk-devbind.py -s
Network devices using DPDK-compatible driver
============================================
0000:03:02.0 'Ethernet Virtual Function 700 Series 154c' drv=igb_uio unused=iavf,vfio-pci,uio_pci_generic
Network devices using kernel driver
===================================
0000:02:00.0 'Ethernet Controller X710 for 10GbE backplane 1581' if=eno1 drv=i40e unused=igb_uio,vfio-pci,uio_pci_generic
0000:02:00.1 'Ethernet Controller X710 for 10GbE backplane 1581' if=em2 drv=i40e unused=igb_uio,vfio-pci,uio_pci_generic
Testing setup
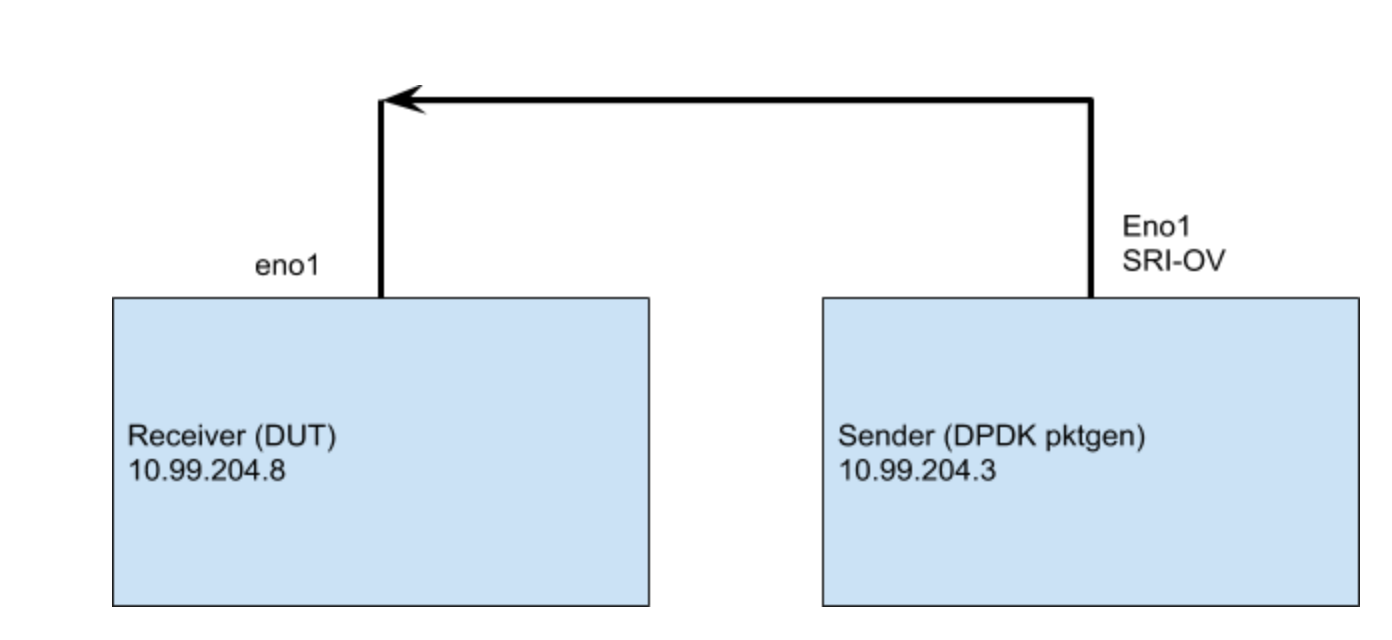
Now that we’re ready to start testing, I should explain our simple test setup. I’m using two x1-small servers; one is the sender (running dpdk-pktgen), the other is a vanilla Ubuntu machine. What we’re going to test is the ability for the receiver Kernel, sometimes referred to as Device Under Test (DUT), to pick up the packets from the NIC. That’s all; we’re not processing anything, the IP address the packets are sent to isn’t even configured on the DUT, so the kernel will drop the packets asap after picking it up from the NIC.

Single flow traffic
Ok, time to start testing! Let’s run pktgen and generate some packets! My first experiment is to figure out how much I can send in a single flow to the target machine before it starts dropping packets.
Note that you can find the exact config in the GitHub repo for this blog. The file pktgen.pkt contains the commands to configure the test setup. Things that I configured were the mac and IP addresses, ports and protocols, and the sending rate. Note that I’m testing from 10.99.204.3 to 10.99.204.8. These are on /31 networks, so I’m setting the destination mac address to that of the default gateway. With the config as defined in pktgen.pkt I’m sending the same 64 byte packets (5 tuple, UDP 10.99.204.3:1234 > 10.99.204.8:81 ) over and over.
I’m using the following to start pktgen.
/opt/pktgen-20.02.0/app/x86_64-native-linuxapp-gcc/pktgen - -T -P -m "2.[0]" -f pktgen.pktAfter adjusting the sending rate properties on the sender and monitoring with ./monitorpkts.sh on the receiver, we find that a single flow (single queue, single-core) will run clean on this receiver machine up until about 120k pps. If we up the sending rate higher than that, I’m starting to observe packets being dropped on the receiver. That’s a bit lower than expected, and even though it’s one flow, I can see the CPU that is serving that queue having enough idle time left. There must be something else happening…
The answer has to do with the receive buffer ring on the receiver network card. It was too small for the higher packet rates. After I increased it from 512 to 4096. I can now receive up to 1.4Mpps before seeing drops, not bad for a single flow!
ethtool -G eno1 rx 4096Multi flow traffic
Pktgen also comes with the ability to configure it for ranges. Examples of ranges include source and destination IP addresses as well as source and destination ports. You can find an example in the pktgen-range.pkt file. For most environments, this is a more typical scenario as your server is likely to serve many different flows from many different IP addresses. In fact, the Linux system relies on the existence of many flows to be able to deal with these higher amounts of traffic. The Linux kernel hashes and load-balances these different flows to the available receive queues on the nic. Each queue is then served by a separate Interrupt thread, allowing the kernel to parallelize the work and leverage the multiple cores on the system.
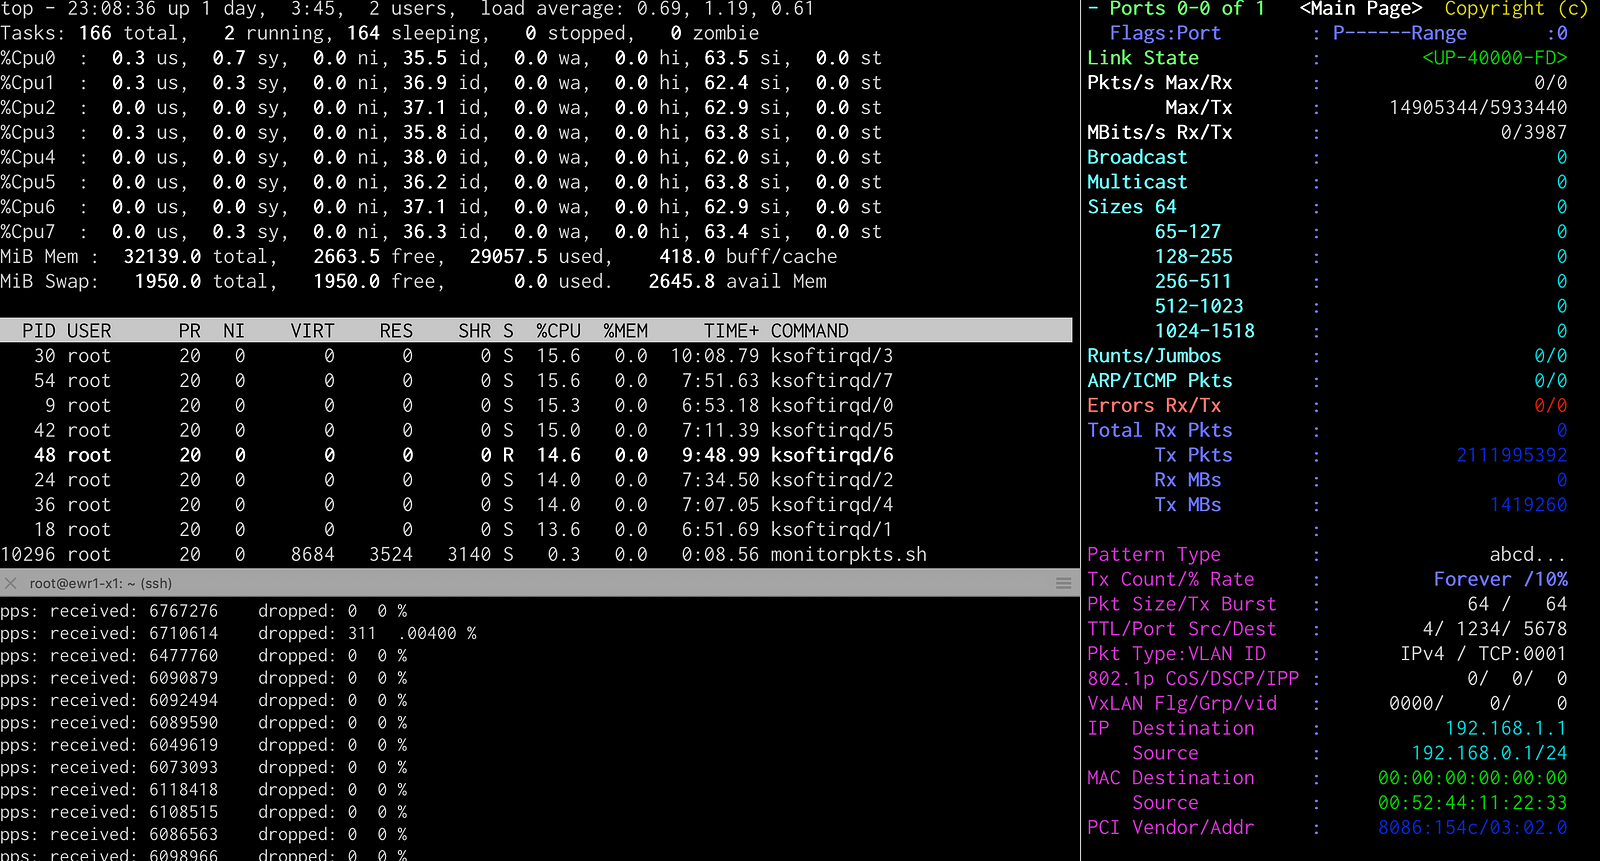
Below you’ll find a screenshot from when I was running the test with many flows. The receiver terminals can be seen on the left, the sender on the right. The main thing to notice here is that on the receiving node, all available CPU’s are being used, note the ksoftirqd/X processes. Since we are using a wide range of source and destination ports, we’re getting proper load balancing over all cores. With this, I can now achieve 0% lost packets up to about 6Mpps. To get to 14Mpps, 10g line rate @64Bytes packets, I’d need more CPUs.

IMIX test
Finally, we’ll run a basic IMIX test, using the dpdk-pktgen pcap feature. Internet Mix or IMIX refers to typical Internet traffic. When measuring equipment performance using an IMIX of packets, the performance is assumed to resemble what can be seen in “real-world” conditions.
The imix pcap file contains 100 packets with the sizes and ratio according to the IMIX specs.
tshark -r imix.pcap -V | grep 'Frame Length'| sort | uniq -c|sort -n
9 Frame Length: 1514 bytes (12112 bits)
33 Frame Length: 590 bytes (4720 bits)
58 Frame Length: 60 bytes (480 bits)
I need to rewrite the source and destination IP and MAC addresses so that they match my current setup, this can be done like this:
tcprewrite \
 - enet-dmac=44:ec:ce:c1:a8:20 \
 - enet-smac=00:52:44:11:22:33 \
 - pnat=16.0.0.0/8:10.10.0.0/16,48.0.0.0/8:10.99.204.8/32 \
 - infile=imix.pcap \
 - outfile=output.pcap
For more details also see my notes here : https://github.com/atoonk/dpdk_pktgen/blob/master/DPDKPktgen.md
We then start the packetgen app and give it the pcap
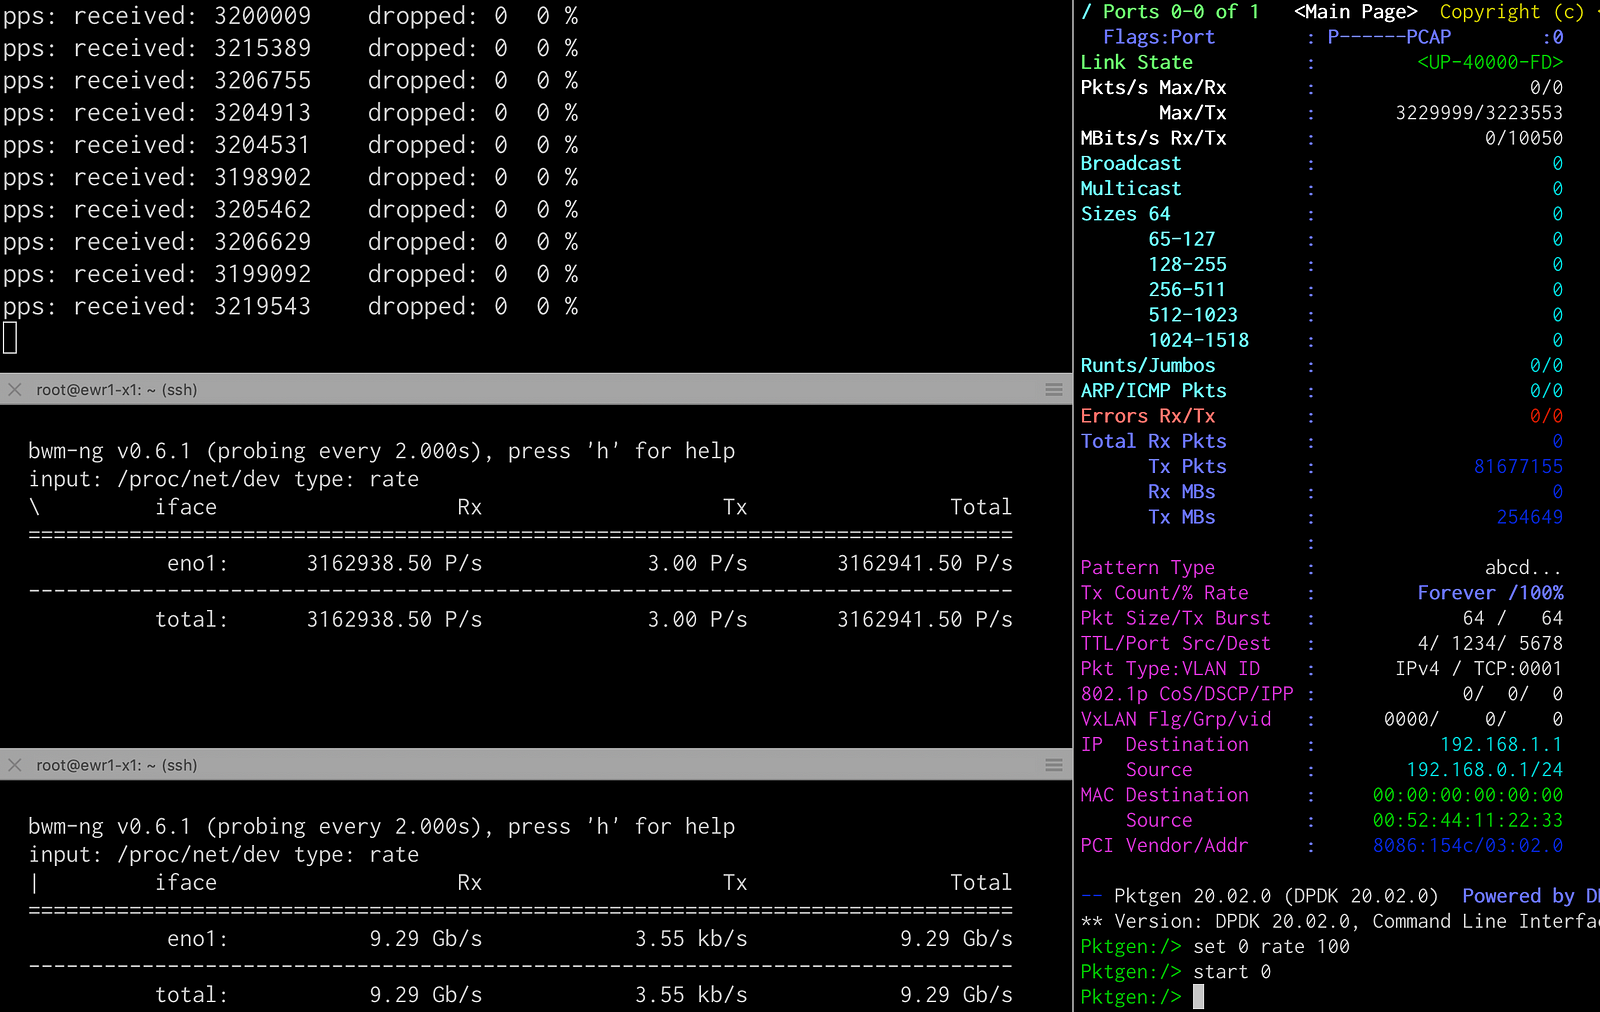
/opt/pktgen-20.02.0/app/x86_64-native-linuxapp-gcc/pktgen - -T -P -m "2.[0]" -s 0:output.pcapI can now see I’m sending and receiving packets at a rate of 3.2M pps at 10Gbs, well below the maximum we saw earlier. This means that the Device Under Test (DUT) is capable of receiving packets at 10Gbs using an IMIX traffic pattern.

Conclusion
In this article, we looked at getting DPDK up and running, talked a bit about what DPDK is, and used its pktgen traffic generator application. A typical challenge when using DPDK is that you lose the network interface, meaning that the kernel can no longer use it. In this blog, we solved this using SR-IOV, which allowed us to create a second logical interface for DPDK. Using this interface, I was able to generate 14Mpps without issues.
On the receiving side of this test traffic, we had another Linux machine (no DPDK), and we tested its ability to receive traffic from the NIC (after which the kernel dropped it straight away). We saw how the packets per second number is limited by the rx-buffer, as well as the ability for the CPU cores to pick up the packets (soft interrupts). We saw a single core was able to do about 1,4Mpps. Once we started leveraging more cores, by creating more flows, we started seeing dropped packets at about 6M pps. If we would have had more CPU’s we’d likely be able to do more than that.
Also note that throughout this blog, I spoke mostly of packets per second and not much in terms of bits per second. The reason for this is that every new packet on the Linux receiver (DUT) creates an interrupt. As a result, the number of interrupts the system can handle is the most critical indicator of how many bits per second the Linux system can handle.
All in all, pktgen and dpdk require a bit of work to set up, and there is undoubtedly a bit of a learning curve. I hope the scripts and examples in the GitHub repo will help with your testing and remember: with great power comes great responsibility.


