

If you’re in the world of cloud infrastructure, then you’ve heard of Kubernetes. Some of you are experts already, while some of us are just learning or getting started. In this blog, we’ll introduce a mysocket controller for Kubernetes and demonstrate how easy it is to use mysocket.io as your cloud-delivered load balancer for your Kubernetes Services. If you’re a Kubernetes user already, then it should just take a minute to get this mysocket controller setup.
See this video for a demo of the Mysocket.io integration with Kubernetes
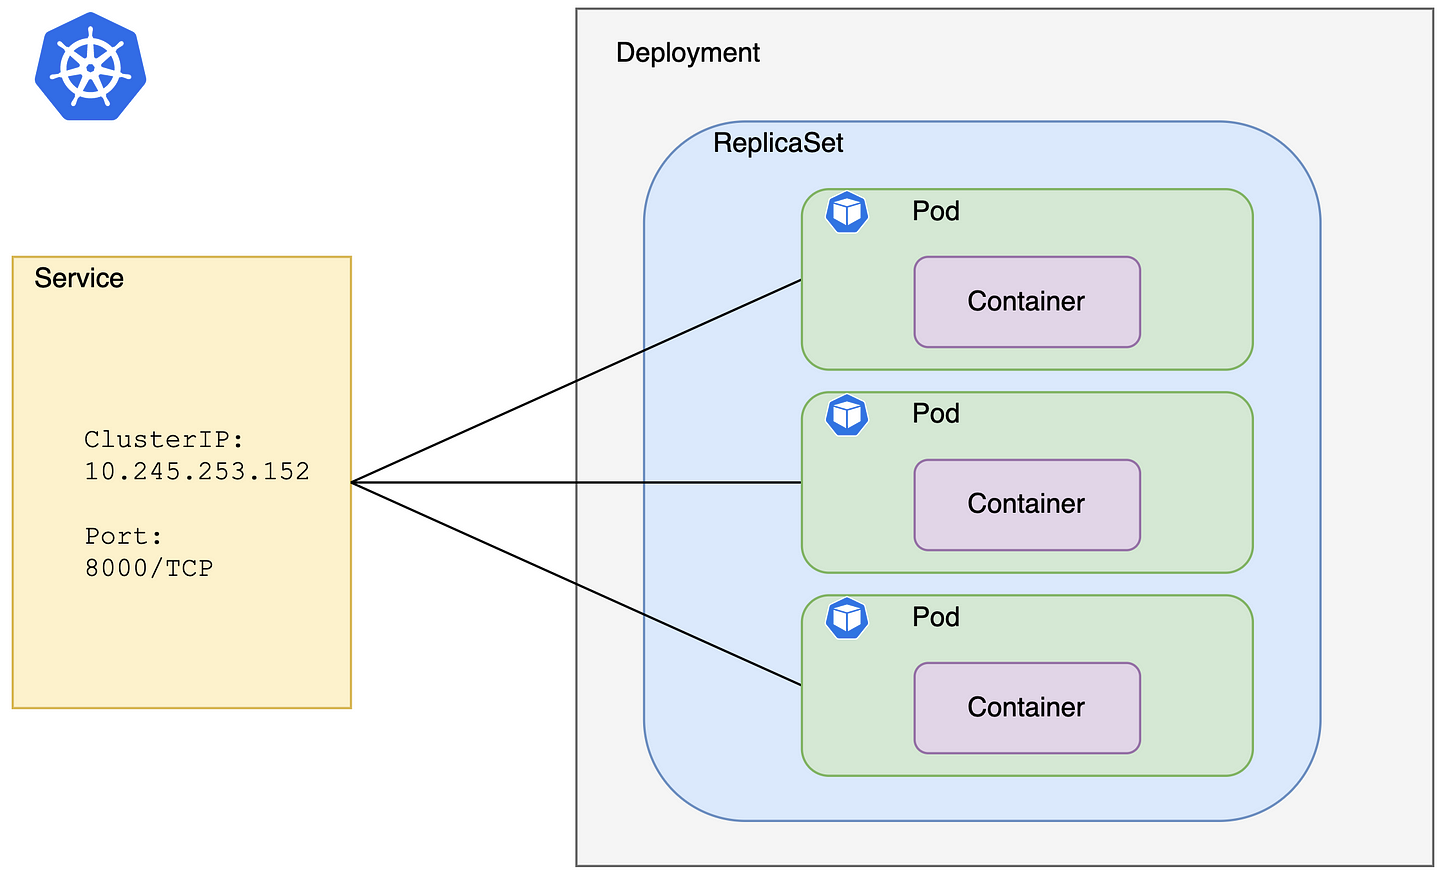
Pods, Deployments, and Services
Before we continue, let’s review some of the main Kubernetes building blocks we will be using to make this work.
A typical workload running in Kubernetes will look something like the diagram below. It typically starts with a deployment, in which you define how many replicas (pods) you’d like.
Since pods are ephemeral and can scale in and out as needed, the Pod IP addresses will be dynamic. As a result, communicating with the pods in your deployment from other Deployments would require constant service discovery, which may be challenging for certain apps. To solve this, Kubernetes has the concept of a Service. A service acts as a logical network abstraction for all the pods in a workload and is a way to expose an application running on a set of Pods as a network service.
In the diagram below the service is reachable via 10.245.253.152 on port 8000. The Service will make sure traffic is distributed over all the healthy endpoints for this service.
Taking your Service Global
Now that we know how a service makes your workload available within the cluster, it’s time to take your workload global! Kubernetes has a few ways to do this, typically using an ingress service. We’re going to use the architecture as outlined in the diagram below. We’ll use Mysocket.io to create a secure tunnel between our ‘myApp’ Service and the Mysocket cloud. From there on, it will be globally available via its anycasted edge nodes.
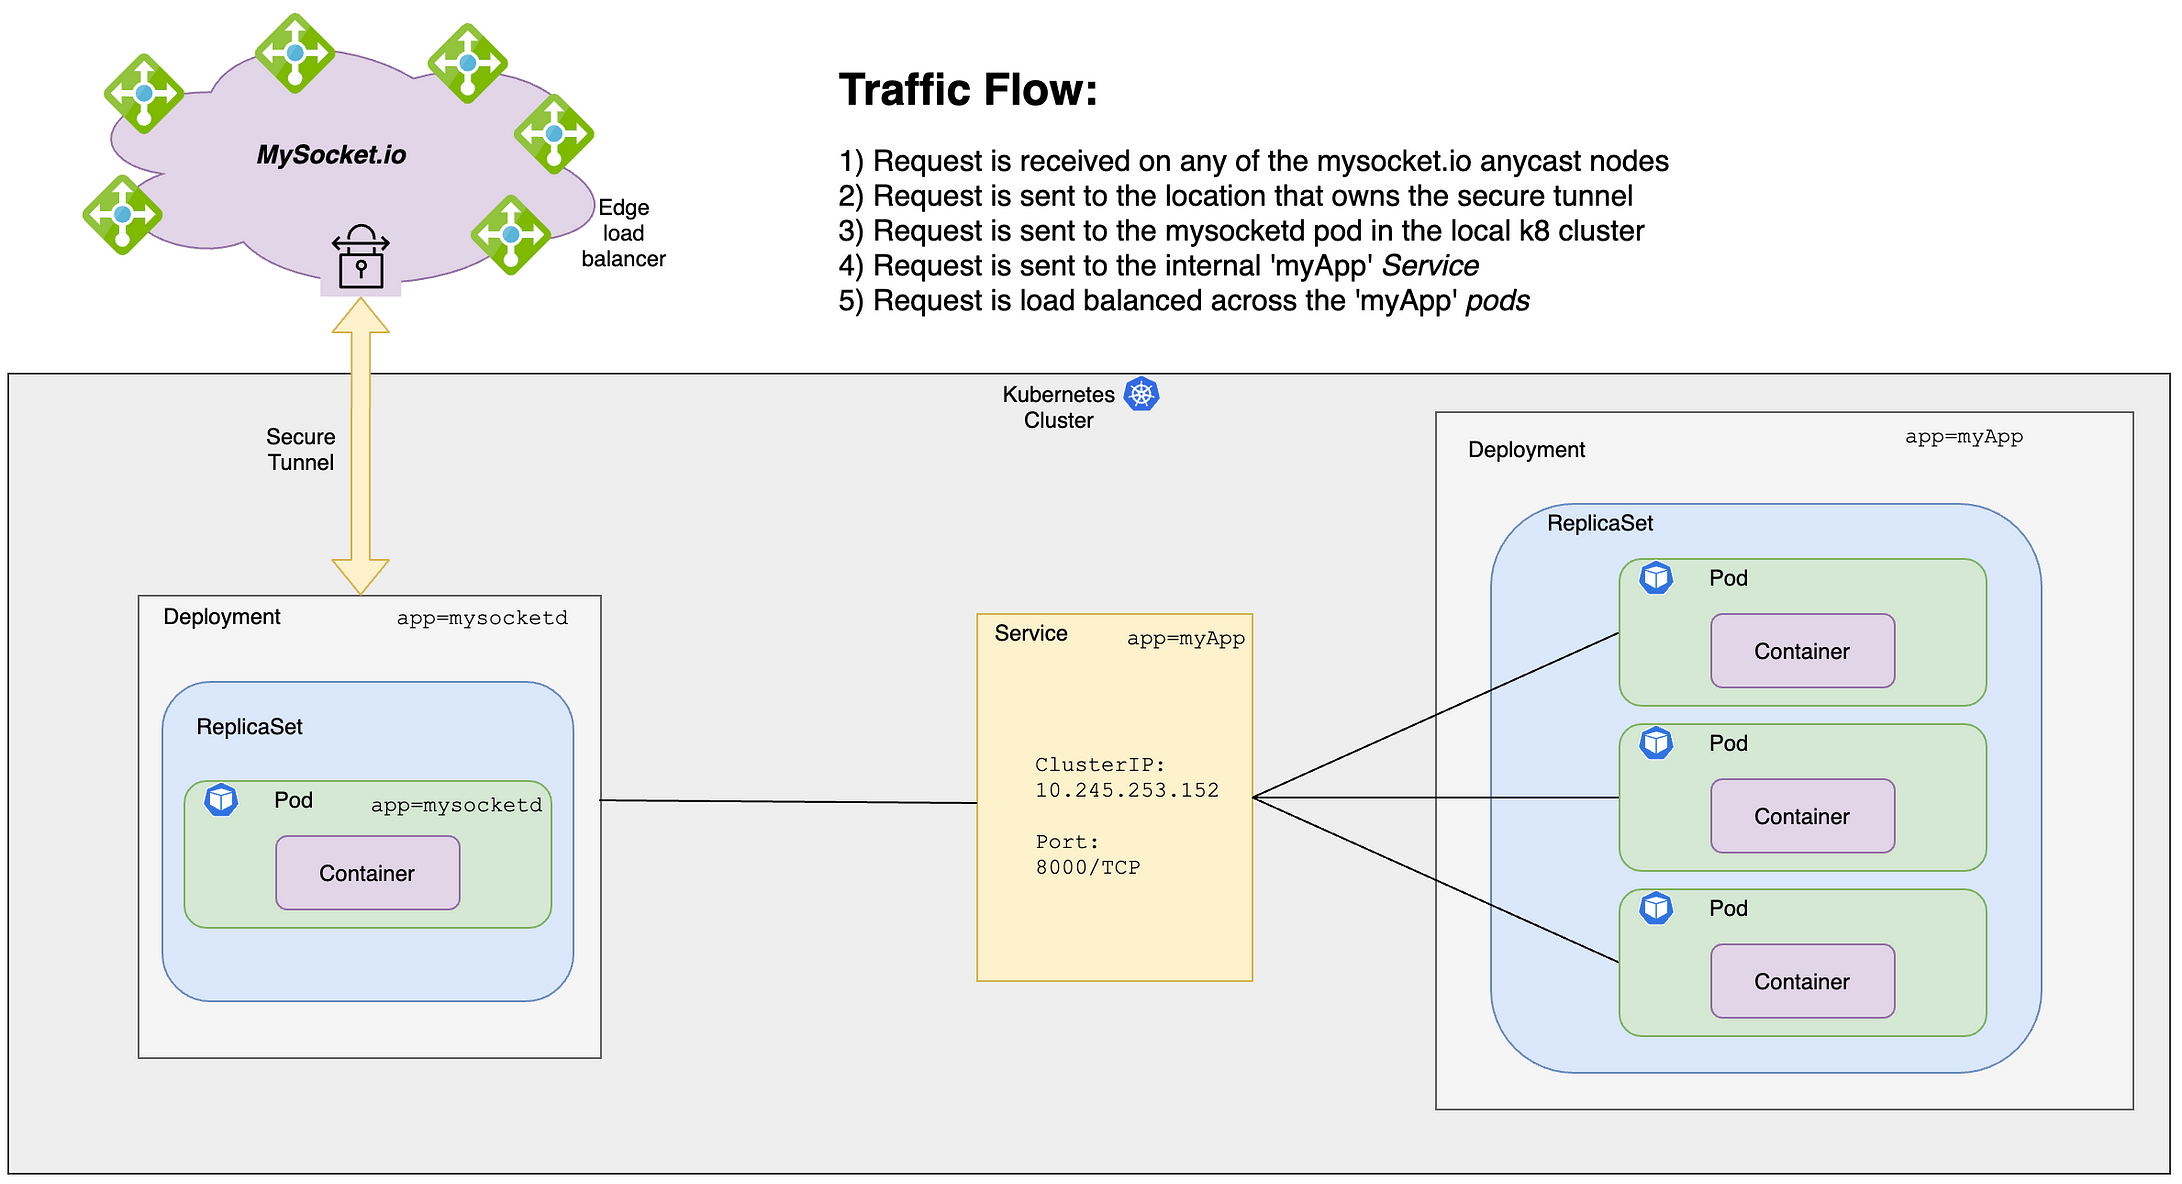
To make this work, we’ll deploy a controller pod that runs the mysocketd container. The Container Image can be found on Docker Hub, and the corresponding Dockerfile on our github repo here.
The mysocketd controller does two things:
1) it subscribes to the Kubernetes API and listens for events related to services. Specifically, it will watch for service events that have the annotation mysocket.io/enabled
If a service has the following annotation mysocket.io/enabled: “true” then the mysocketd app will start a thread for that service.
2) In the per service thread, using the Mysocket API, a new mysocket.io “Socket” object is created if needed. This will give the “myApp” service a public DNS name and public IP. Next, it will check with the mysocket.io API to see if a tunnel already exists; if not, then a new one is created.
Finally, the secure tunnel is established, and the “myApp” service is now globally available and benefits from the mysocket.io high-performance infrastructure.
Demo time. How to Deploy mysocketd to your cluster
The easiest way to get started is to download the mysocketd workload yaml file from the Mysocket Kubernetes controller repository and update the following three secrets to the ones for your mysocket account (line 14,15,16).
email: <mysocket login email in base64>
password: <mysocket password in base64>
privatekey: <mysocket private ssh key in base64>
Then simply apply like this and you’re good to go!
kubectl apply -f mysocketd.yamlCool, now we have the controller running!
A simple demo work load
Next up, we’d like to make our myApp service available to the Internet by using the mysocket.io service. I’m going to use this deployment as our demo app. The deployment consists of three pods, with a little python web app, printing its hostname.
Next up, we’ll build a service (see definition here) that acts as an in-cluster load balancer for the demo workload, and we’ll request the Service to be enabled for Mysocket.io.
$ kubectl apply -f demo-deploy.yaml

$ kubectl apply -f demo-service.yaml

$ kubectl get all -n demo-app
NAME                            READY   STATUS    RESTARTS   AGE
pod/demo-app-6896cd4b88-5jzgn   1/1     Running   0          2m22s
pod/demo-app-6896cd4b88-78ngc   1/1     Running   0          2m22s
pod/demo-app-6896cd4b88-pzbc7   1/1     Running   0          2m22s
NAME                   TYPE        CLUSTER-IP       EXTERNAL-IP   PORT(S)    AGE
service/demo-service   ClusterIP   10.245.114.194   <none>        8000/TCP   64s
NAME                       READY   UP-TO-DATE   AVAILABLE   AGE
deployment.apps/demo-app   3/3     3            3           2m22s
NAME                                  DESIRED   CURRENT   READY   AGE
replicaset.apps/demo-app-6896cd4b88   3         3         3       2m22s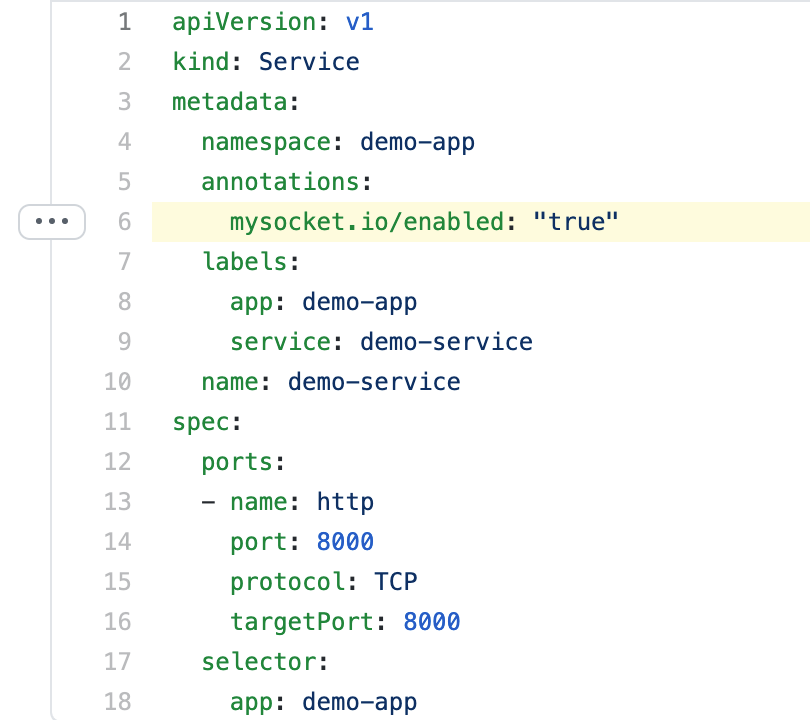
The same can be done for existing services: to do so, just edit your existing Service definition and add the “mysocket,io/enabled” annotation, like this:
kind: Service
metadata:
  annotations:
    mysocket.io/enabled: "true"
After applying this change, the mysocketd controller will detect that the service has requested to be connected to the Mysocket global infrastructure. The controller will create the Socket and Tunnels as needed and start the tunnel.
A quick load balancing test shows that requests to our global mysocket endpoint are now being load-balanced over the three endpoints.
$ for i in {1..60}; do  curl -s \
  https://blue-snowflake-1578.edge.mysocket.io/ & ;done | sort | uniq -c | sort -n

  19 Server: demo-app-6896cd4b88-pzbc7
  20 Server: demo-app-6896cd4b88-5jzgn
  21 Server: demo-app-6896cd4b88-78ngc
  60
Just like that, in a few seconds, your workload is globally available. Pretty neat he!? Make sure to watch the video recording of this demo as well.
Wrapping up
In this article, we looked at how we can easily connect Kubernetes Services to Mysocket.io. We saw that it was easy to use. All that is needed is to: 1) start the Mysocketd controller, and: 2) add the mysocket annotation to your Services. By doing so, we are giving the Kubernetes service a publicly reachable IP address, a TLS cert, and it instantly benefits from the mysocket.io Anycast infrastructure. Pretty powerful and easy to use.
I should add that this Mysocket Controller for Kubernetes is for now just a starting point, ie. an MVP integration with Kubernetes. There are ways to improve this, both in terms of user-friendliness and high availability (i.e. more than one pod). The code for this Kubernetes integration is open source, and we’d be happy to accept improvements. Mostly it serves as an example of what’s possible and how we can continue to build on the Mysocket services.
Last but certainly not least, I’d like to thanks Brian for his code to improve the various mysocketctl client libraries. Also, a big thanks to Bas Toonk (yes, my brother) for his help with this MVP. Most of this was his work, thanks buddy!
Finally, I hope this sparked your imagination, and you’ll all give it a whirl, and let me know your experience.