

In this blog post, we’ll introduce an exciting new feature that, with the help of Mysocket, allows you to deploy your own Beyond Corp setup.
What is Zero Trust
The main concept behind Zero Trust is that users shouldn’t just be trusted because they are on your network. This implicit trust problem is something we typically see with, for example, corporate VPNs. With most corporate VPN’s once a user is authenticated, the user becomes part of the corporate network and, as a result, has access to many of the resources within the corporate infrastructure. In other words, once you’re on the VPN, you’re within the walls of the castle, you’re trusted, and you have lots of lateral access.
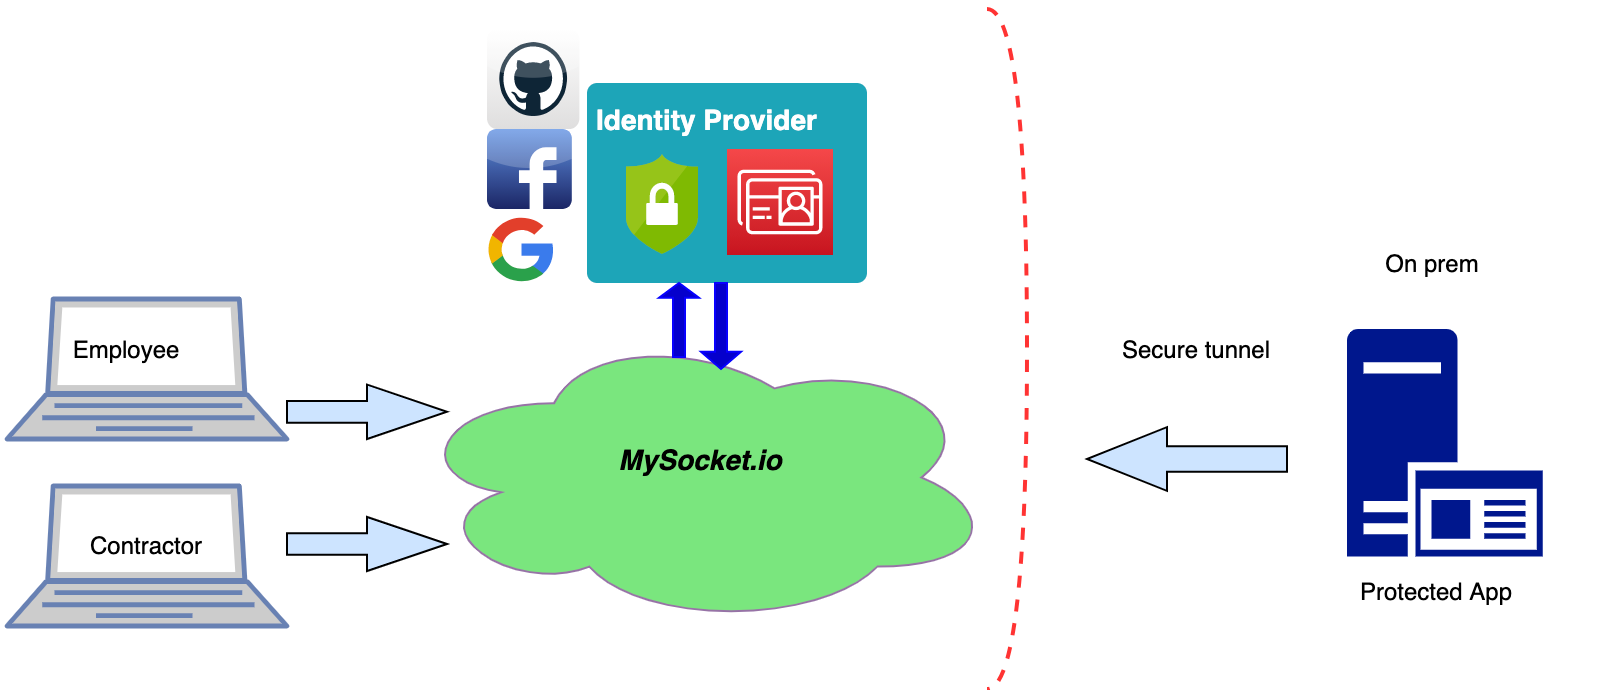
The world is changing, and the once traditional approach of trusting devices on your network are over. A few years ago, Google started the journey to their implementation of Zero trust called Beyond Corp. One of the core building blocks to get to a Zero Trust model is Identity aware application proxies. These proxies can provide strict access control on a per-application granularity, taking the users’ identity and contexts such as location and device status into account.
Identity aware proxies
As of today, the Mysocket proxies have support for OpenID Connect, and with that, your sockets are identity-aware. This means that mysocket users can now enable authentication for their services and provide authorization rules.
mysocketctl connect \
   --port 3000 \
   --name "My Identity aware socket" \
   --cloudauth \
   --allowed_email_domains "mycorp.com" \
   --allowed_email_addresses "contractor1@gmail.com,john@doe.com"
The example above shows how we can enable authentication by using the “cloudauth” CLI parameter. With cloudauth enabled, users will be asked to authenticate before access to your service is granted. Currently, we support authentication using Google, Facebook, Github, or locally created accounts.
The authentication flow uses OpenID connect to interact with the various Identity providers (IDP); thus, we can easily add more Identity providers in the future. We’re also looking at SAML as a second authentication flow. Please let us know if you have a need for more IDP’s or SAML, and we’ll work with you.
Authorizations rules
In addition to what the Identity Service Provider (IDP) provides, mysocket also provides two authorization rules. The — allowed_email_domain allows users to specify a comma-separated list of email domains. If your users are authenticating using their mycorp.com email address, then by adding this domain as an allowed_email_domain, will make sure only users with that domain have will be granted access.
Since multiple identities providers are supported, it’s easy to extend access to contractors or other 3rd party users. To provide access to external contractors that are not part of your mycorp.com domain, we can use the allowed_email_addresses parameter to add individual identities. This is great because now you can provide these contractors access without creating corporate accounts for them.
These are just two authorization rules; we’re planning to add more types of rules in the near future. Additional authorization rules that come to mind are, Geo-based rules (only allow access from certain countries or regions) or time of day type rules. If you require these types of rules or have suggestions for additional authorization rules, please let us know!
VPN replacement
One of the unique features of mysocket is that the origin server initiates the connection to the Mysocket edge. This means that the origin servers can be on a highly secure network that only allows outbound connections. Meaning the origins can be hosted behind strict firewall rules or even behind NAT, like for example, a Private AWS VPC. With this, your origin server remains private and hidden.
With the addition of authentication and authorization to Mysocket, we can now, on a very granular basis, provide access to your private services. Combining the secure outbound tunnel property and the identity-aware sockets, we can now look at this to provide an alternative to VPNs, while providing much more granular access to private or corporate resources.
Example use case
Imagine a scenario where you work with a contractor that needs access to one specific private application, say an internal wiki, ticket system, or the git server in your corporate network. With the traditional VPN setup, this means we’d need to provide the contractor with a VPN account. Typically this means the contractor is now part of the corporate network, has a corporate user account, and now has access to much more than just the application needed.
Instead, what we really want is to only provide access to the one application and be very granular in who has access. With the addition of identity-aware sockets, this is now possible.
Demo time!
Alright, let’s give this a spin, demo time! In this demo, we’re making a Grafana instance that’s on a private network and behind two layers of NAT available to our employees as well as a contractor.
We’ll start by setting up the socket and tunnel using the “mysocketctl connect” command.
This works great for demo’s; for more permanent setups, it’s recommended to use “mysocketctl socket create” and “mysocketctl tunnel create” so that you have a permanent DNS name for your service.
mysocketctl connect \
   --port 3000 \
   --name "My Identity aware socket" \
   --cloudauth \
   --allowed_email_domains "mycorp.com" \
   --allowed_email_addresses "andree@toonk.io,john@doe.com"
With this, we created a socket on the mysocket.io infrastructure, enabled authentication, and provided a list of authorization rules. The same command also created the secure tunnel to the closest mysocket.io tunnel server, and we’re forwarding port 3000 on localhost to the newly created socket.
Next, we launch a Grafana container. For fun, I’m passing in my AWS cloudwatch credentials, so I can create some dashboards for my AWS resources. I’ve configured grafana for proxy authentication. Meaning it will trust mysocket.io to do the authentication and authorization. Grafana will use the HTTP headers added by mysocket to determine the user information.
[auth.proxy]
enabled = true
header_name = X-Auth-Email
header_property = username
auto_sign_up = true
headers = Email:X-Auth-Email
The complete example grafana.ini config file I used can be found here. Now we’re ready to launch Grafana. I’m doing this from my laptop, using Docker.
docker run -i -v grafana.ini:/etc/grafana/grafana.ini \
 -e “GF_AWS_PROFILES=default” \
 -e “GF_AWS_default_ACCESS_KEY_ID=$ACCESS_KEY_ID” \
 -e “GF_AWS_default_SECRET_ACCESS_KEY=$SECRET_ACCESS_KEY” \
 -e “GF_AWS_default_REGION=us-east-1” \
 -p 3000:3000 grafana/grafana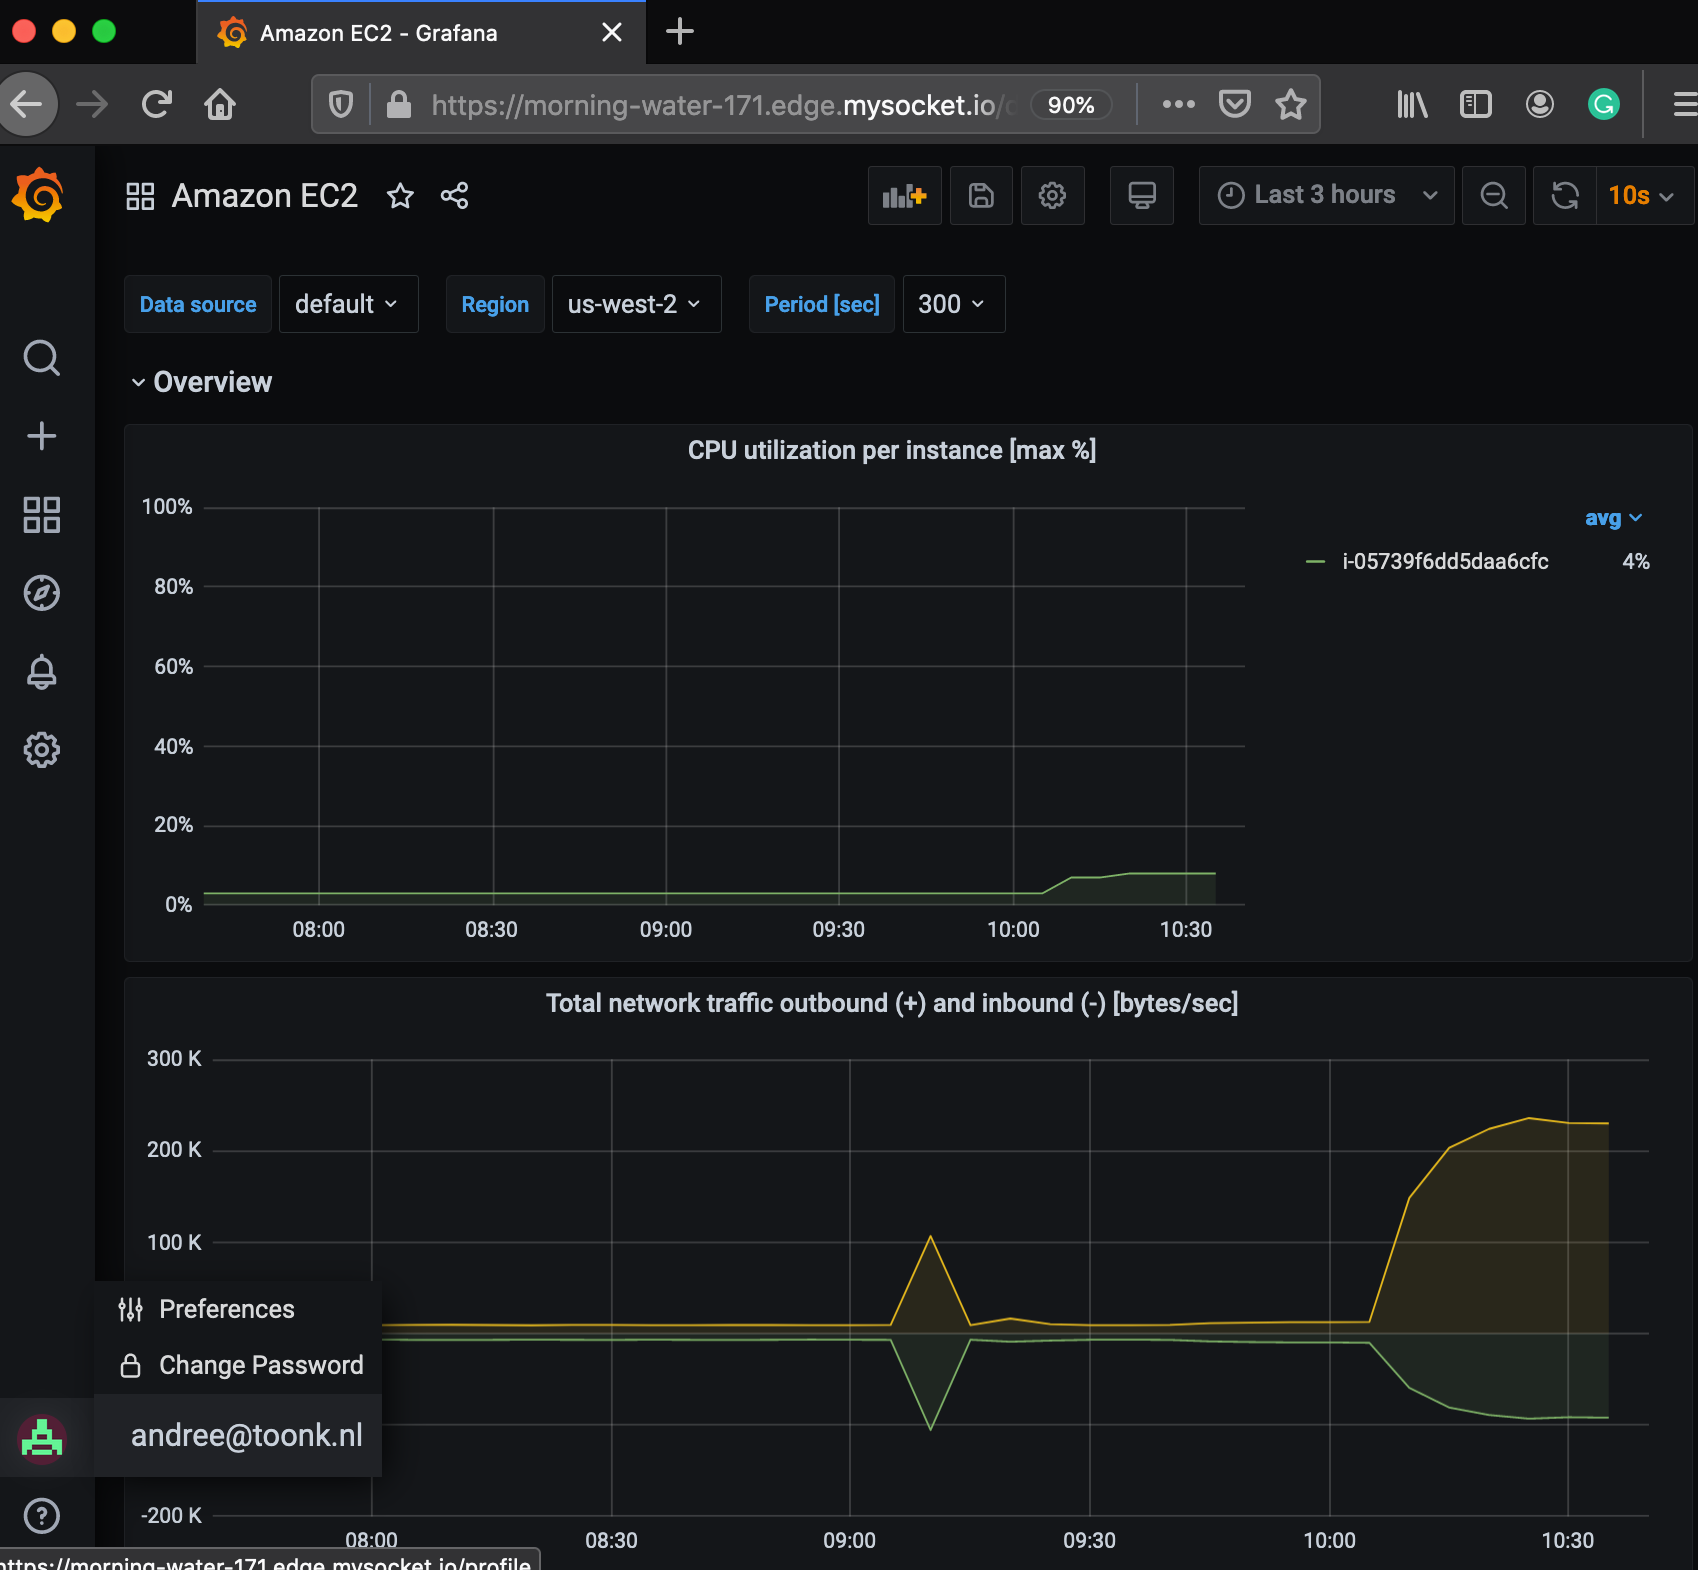
Grafana is now listening on localhost port 3000. The mysocket connection we created earlier is relaying authenticated and authorized traffic to that local socket. With that, we should now be able to test and see if we have access to Grafana.
Wrapping up
In this article, we introduced identity aware sockets. We saw how Mysocket users can easily enable authentication for their HTTP(S) based sockets and how OpenID connect is used for the authentication flow to Google, Facebook, or Github (for now). We then looked at how authorization rules can be added by either matching the email domain or even a list of email addresses.
With this, it’s now easy to provide access to internal applications, from any device, any time anywhere, without the need for a VPN.